Sunday, November 2, 2014

Ruta graveolens

Common Names: rue, common rue, herb of Grace
Family: Rutaceae (citrus Family)

Description
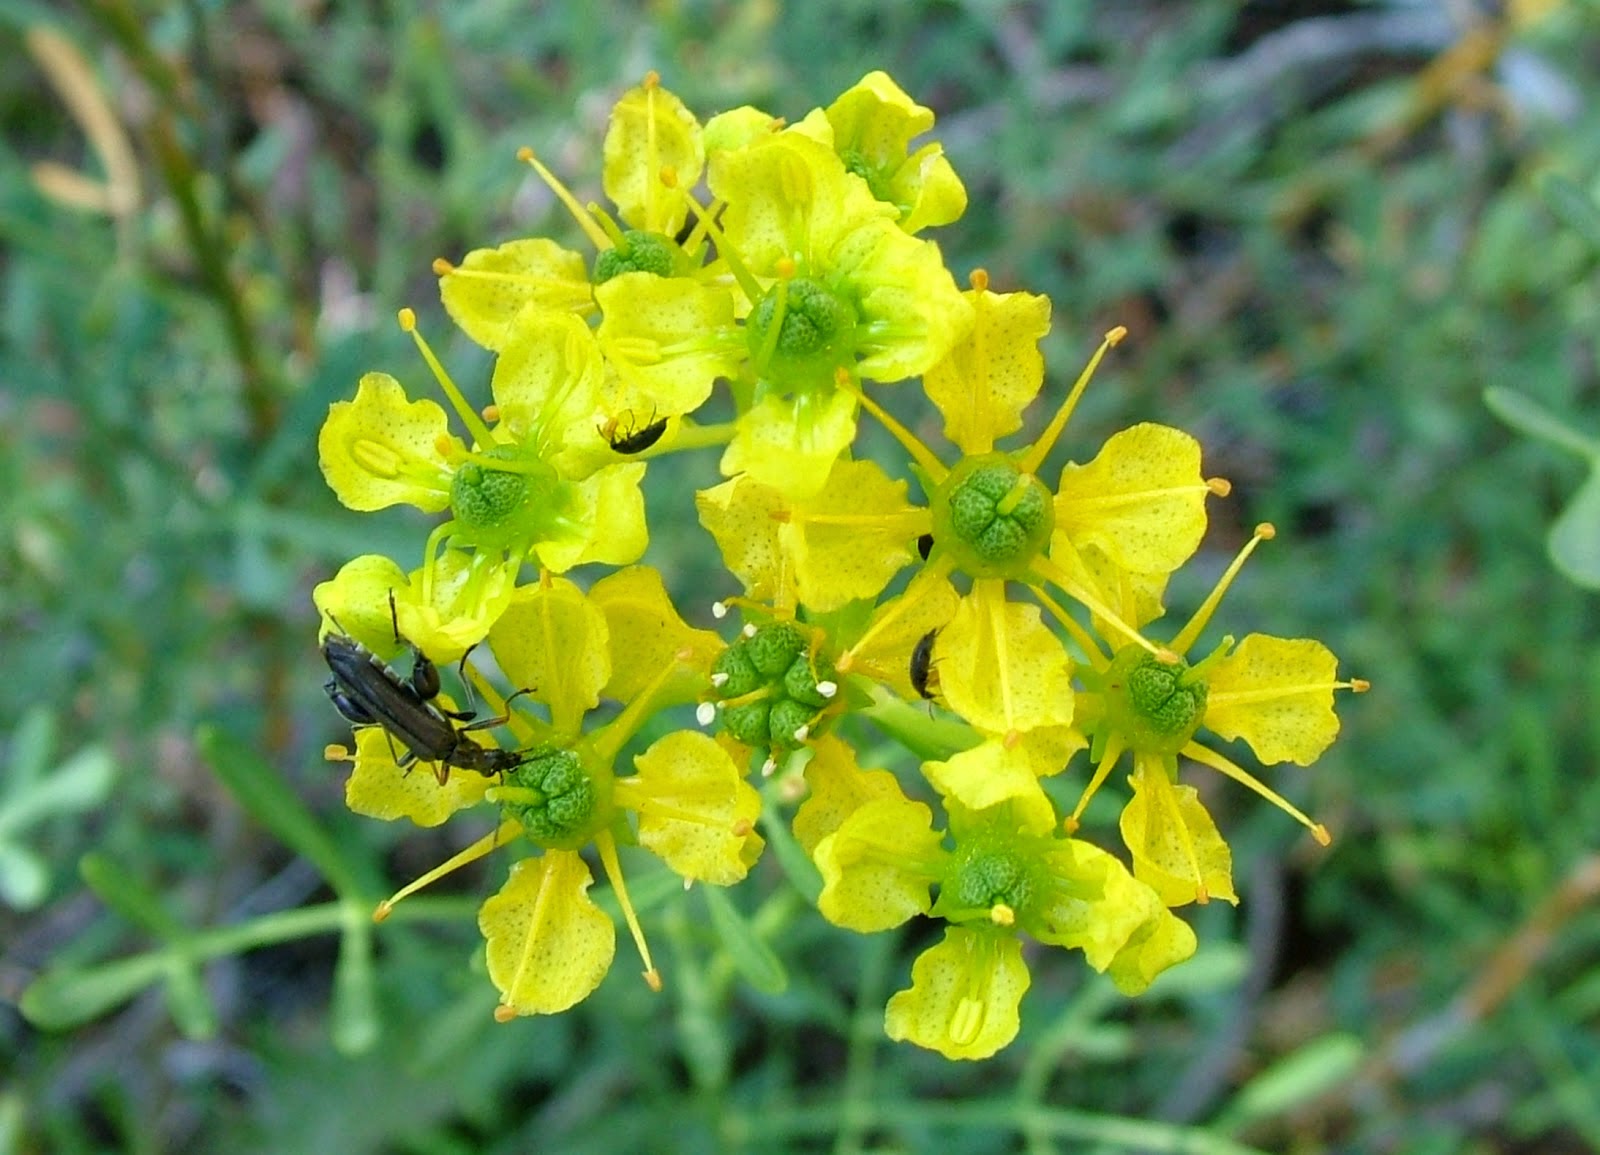
Rue is a small evergreen subshrub or semiwoody perennial 2-3 ft (0.6-0.9 m) tall and almost as wide. The stems become woody near the base, but remain herbaceous nearer the tips. The 3-5 in (7.6-12.7 cm) long leaves are dissected pinnately into oblong or spoon shaped segments. They are somewhat fleshy and usually covered with a powdery bloom. The sea green foliage has a strong, pungent, rather unpleasant scent when bruised. The paniculate clusters of small yellow flowers appear in midsummer, held well above the foliage and often covering most of the plant. Each flower is about 0.5 in (1.3 cm) across with four concave notched petals. Rue usually grows in a compact, rounded mound. 'Jackman's Blue' has beautiful bluish green foliage and stays in a tight, rounded form, smaller than the species; this is the most popular cultivar in Europe. 'Blue Beauty' is small, to 18 in (45.7 cm) tall, with powdery blue foliage. 'Variegata' has white splashes on the leaves and is often used in floral arrangements.


Location
Common rue is native to southern Europe and northern Africa. It is apparently no longer found in the wild, but occasionally escapes from gardens and naturalizes along roadsides and waste areas in North America and Europe, especially in the Balkans.

Culture
Rue thrives in poor sandy soils, and hot, dry sites.

Light: Rue grows best in full sun.

Moisture: Water new plantings regularly. Once it gets established, rue is quite tolerant of drought.

Propagation: Rue can be propagated from tip cuttings taken in autumn and started in moist sand. Seeds sown in spring germinate in about 14 days and will produce plants that flower in their second year. The seeds should be exposed to light, not buried.

Usage
Rue is an attractive "ever bluish green" shrub, and a standout in the herb garden. It's often included in herb gardens just for its historical interest. Rue responds well to pruning - it can be shaped into a rounded mass and used in borders and beds, where it goes well with light colored flowers. Use rue to create a low hedge around the herb garden, as a specimen in the rock garden, or a border in a knot garden. Prune back to the old wood in spring to encourage bushiness. An attractive container plant, rue is often grown in a pot on the patio or on a sunny windowsill. Good drainage is essential to prevent root fungus problems.
Although they are bitter in large quantities, small amounts of rue leaves added to cream cheese, salads and egg dishes impart a pleasant musky flavor. Dogs and cats (as well as witches and evil spirits) hate the smell of rue. The dried and crushed leaves can be an effective insect repellent.

Features
Rue has been used as a medicinal and "antimagic" herb for centuries. It was considered a reliable defense against witches. Gunflints boiled in a mixture of rue and vervain were said improve the shooter's aim. Artists, including Michelangelo and Leonardo da Vinci, improved their creativity and eyesight by ingesting rue. Rue is a symbol of regret, sorrow and repentance, and Catholics used sprigs of it to sprinkle holy water on worshippers. The rue leaf was the model for the suit of clubs in playing cards. Rue was formerly used to treat almost every ailment known to Man, but modern herbalists now question its effectiveness as well as its safety.
It is said that the rue stolen from your neighbor's garden will grow best.

WARNING
Some people are allergic to rue and get a skin rash from handling the plant. Especially on hot days, just brushing against rue can cause water blisters and blotchy skin, much like poison ivy. For some people, ingestion causes increased photosensitivity and can lead to severe sunburn. Ingesting large amounts of rue can cause violent stomach pain, vomiting, and convulsions. Pregnant women should never ingest rue.


Acorus gramineus

Acorus gramineus
Common Names:
 Japanese sweet flag, Japanese rush, grassy-leaved sweet flag, dwarf sweet flag
Family: Araceae (arum Family)

Description
Japanese sweet flag is an aquatic or wetland perennial with semievergreen grasslike foliage. It has narrow, 6-14 in (15-35.6 cm) glossy leaves and looks like thick, lush grass. The leaves are carried in two ranks, like opposing fans. They are flat, about a 0.5 in (1.3 cm) wide and tend to flop over. The insignificant flowers, shaped like little horns, are produced in midsummer on erect hollow stems. Usually only plants grown in water produce flowers. The cultivar, 'Ogon' (a.k.a. 'Wogon') is also called golden variegated Japanese sweet flag, or Japanese rush. It has arching foliage with cream and chartreuse stripes, and is a little smaller than the species, with leaves a 0.25 in (0.6 cm) wide and just 10 in (25.4 cm) long. 'Variegatus' has green and white striped leaves. 'Licorice' has foliage and rhizomes that smell like anise. 'Minimus', and 'Minimus Aureus' which has yellowish leaves, are tiny cultivars, only 3 in (7.6 cm) tall and suitable for aquaria and small pots.
Location
Japanese sweet flag is native to eastern Asia where it grows in wetlands and shallow water.
Culture
Light: Full sun to partial shade.
Moisture: Japanese sweet flag requires very moist soil. It does just fine in the wetland zone along ponds and ornamental pools, and even submersed in water 3-6 in (7.6-15 cm) deep. It can be grown in regular garden situations but must be watered frequently. The leaf tips will turn brown and wither if the soil dries for even brief periods.
Propagation: Propagate Japanese sweet flag by dividing the rhizomes in spring, then letting the new divisions get established in a pot for a few weeks before planting out.
Usage
Japanese sweet flag is used along pond margins and at the edges of water gardens. It's a great foliage plant for shallow water and marshy areas. It spreads aggressively by rhizomes and will eventually produce a seamless turf, making a beautiful groundcover for the front of a bog garden. When walked upon, it releases a fragrance reminiscent of cinnamon. If you don't want a solid stand of Japanese sweet flag, grow it in submerged containers so it can't spread. In Japan, the smaller cultivars often are grown in shallow water in containers indoors.
Features
There are only two species in the genus Acorus. The other is A. calamus, or sweet flag, the source of oil of calamus, used medicinally and in perfumes and soaps. Sweet flag was formerly used as a "strewing herb', to spread on the floor so that a pleasant scent would be released when trod upon. Japanese sweet flag is not quite as aromatic as the true sweet flag. Although the sweet flags are in the Jack-in-the-pulpit family, their flowers don't look much like the typical spathe and spadix of most members of the family.


Chamaerops humilis

Common Names: European fan palm
Family: Arecacea/Palmae (palm Family)

Description
The attractive little European fan palm has become very popular in recent years, mostly due to its cold hardiness. Severe freezes in the mid-eighties decimated many other more tender palm species then being grown in central and northern Florida. Millions of dollars worth of landscape plants were killed, creating a demand for more cold resistant varieties that could withstand the occasional cold snap. This small fan leafed palm fit the bill. Not only can it resist temperatures below 20°F (-6° C) but it is fairly fast growing and drought resistant too!

The European fan palm forms clumps than can grow up to 15 ft (4.5 m) in height. The triangular, fan shaped leaves grow to about 20-24 in (50-60 cm) long by 24 in (60 cm) wide. They are deeply divided into multiple segments that are themselves split at the tip and they are supported on 3-4 ft (90-120 cm) stems. This is an extremely variable plant both in color (the leaves range from blue green to grey green to yellow green) and in shape. Some plants form suckers more freely than others to become very shrubby plants that may reach 15 ft (4.5 m) in width. Other individuals can be seen that are almost dwarf growing just 5 ft (1.5 m) tall by 4 ft (1.2 m) wide. These days it is popular to remove all but a few of the suckers and to prune the leaves to form a cluster of clear trunked "mini" palms (see photo).
Small, bright yellow flowers held close to the trunk are hidden behind the leaf stems which are armed with very sharp teeth. The flowers are followed in the fall by fruits which are dark yellow, orange or brown, and about 0.5 in (1 cm) in diameter.

Location
Chamaerops humilis is native to the hot dry hills and mountains of the Mediterranean Sea basin. Its native range extends from Africa's Atlas Mountains in Morocco to Spain and France and eastward to Turkey.

Culture
The European Fan palm is very adaptable to many kinds of well drained soils.

Light
 European fan palm prefers bright sunny locations, but it also does well in part shade with some direct sunlight. It will survive in rather heavy shade but "stretches" to lose its compact shape.

Moisture
Provide adequate moisture for fastest growth. This palm is very drought tolerant once established. It dislikes soggy soils.

Propagation
European fan palm is usually propagated from seed. It can also be propagated by dividing clumps or removing suckers, methods that require superhuman effort. I once spent a weekend dividing a clump. The effort left me a sweaty, sore, bloody mess (from the sharp teeth on the leaf stems!) Believe me, seeds are the way to go! Better yet, reasonably priced specimens are readily available from nurseries and discount stores.

Usage
Chamaerops humilis is as versatile as it is beautiful! With the leaves trimmed up to show off the trunk, it makes a beautiful specimen plant - a delightful natural sculpture to grace your patio or entryway. Unpruned, they assume an attractive shrubby form. Use one as a screen or plant several side by side to form a barrier. Planted in groupings, they will accent that hard-to-garden, bare corner of your yard.
The European fan palm is excellent in containers and urns. And thanks to its drought resistance and durability to heat it can thrive in harsh urban conditions. This palm is somewhat salt resistant and may be grown near the ocean if given some protection (behind a dune, building, etc.)

Features
Beauty, ruggedness, versatility, cold hardiness and drought resistance add up to makeChamaerops humilis a winner. If that isn't enough, the European fan palm is also fairly fast growing when supplied with adequate moisture and fertilizer.


How to Care for Your Pond

1 Make a pond by digging a hole suitable to you and line in with plastic or use the pond in your neighborhood.

2 Buy an already made pond, if you are not interested in building a pond. You can get this from your local plant nursery.

3 Take care of your pond by putting duck weed and a few tadpoles or fish in, to create a friendly environment for the pond guests. Putting in water plants and rocks it is a great idea. A good pond can encourage dragonflies that lay their eggs in the pond.

4 Once a balance of plants and animal life is established, the water should remain clear without needing further attention. However, if you notice any changes in the numbers of fish and plants, the water balance may be slightly off and a surge of algal growth may result.

5 Aquatic plants don't require much attention, but periodic division helps keep them healthy. Every couple of years, in late spring or early autumn, divide plants that are overgrown or crowding neighbouring plants. Thick roots may need to be divided with a spade or a knife and divided clumps can be replanted singly.

6 Pests are less of a problem in ponds with fish, as the fish eat the insect larvae. In late summer aphids often attack water lilies and other aquatic plants, causing discolouring and decay. Use a hose pipe to wash away the aphids, or submerge the leaves of plants for 24 hours.

7 Here are some water plants to try in your pond:
Nymphaea 'Gonnere' - waterlily with scented white flowers
Nymphaea 'Pygmaea Helvola' - dwarf waterlily good for smaller ponds with bright yellow cupped flowers
Butomus umbellatus - a flowering rush with distinctive umbels of pink flowers on metre-long stems
Iris laevigata - Japanese water iris - Lovely white iris that likes to grow in shallow water
Pontederia cordata - free spreading marginal plant with spikes of blue flowers at the end of summer


Tips


  • If you live in a country where cane toads are a problem they can be prevented from entering by surrounding to pond with a vertical 70cm wall. Cane toads cannot jump or climb this high but most tree frogs will be able too, just in case leave 20mm gaps between the walls to let small ground-dwelling frogs through (note this will not let ADULT cane toads through). Inspect your pond for cane toads every 3 to 4 days, if you find any place them into a plastic bag and humanely kill them (if a pest in your country), also remember to remove and destroy and cane toad spawn. To tell apart frog spawn from cane toad spawn, frog spawn is usually in small clusters and have a small-medium black dot inside. Whereas cane toad spawn is in long strings and have a big black dot inside.
  • If your pond is large enough get some Peking or mallard ducks for the pond Muscovy ducks carry a lot of nasty diseases that transfer to human through the ducks faeces so if you do have them make sure to clean the faeces from around the pond
  • It is nice to have some exotic plants,wildlife in or around the pond but some might do harm to the wildlife or plants that already live there make sure to do research if that certain animal plant will affect the ponds residents that live there already you may also need a licence for some wildlife

Warnings

  • Never clean your pond. To create a sustainable eco-system you need algae, but only on the walls of the pond, if it gets into the thick of the water, clean it out.
  • Do not just put ordinary tap water in as it contains chlorine and other chemicals which will kill most wildlife that enters your pond. *Let tap water stand for a week before adding it in or, alternatively buy a aquarium chlorine product which removes and harmful chemicals. Also, if you do accidentally add normal tap water in, just adding the chlorine remover should save your beloved pond without any harm.
  • If removing cane toads take caution with the poisonous glands located near the neck that will ooze out a white gel if disturbed. Remember not to ingest this gel and wash your hands afterwards, even if you wear gloves. This poison is strong enough to kill most small animals (household pets) and rarely, small children. However this poison is strong enough to make an average human sick and medical attention should be sleeked if the poison is ingested or absorbed.
Things You'll Need For Caring of your pond 
  • a pond
  • water plants
  • duck weed
  • rocks
  • A materiel to make a wall around the pond (rocks/bricks)
  • Gloves


How to Make Roses Last Longer

If you want a rose bush to flower for the longest possible time, try to begin by selecting a variety with a long flowering period. Long-flowering varieties include Mayflower," "Bright Melody," or "Mary Rose." If you have already chosen your variety, don’t despair! You can take steps to keep them flowering for as long as possible, whether they're in a vase or in your garden. See Step 1 of your preferred method below to get started.

Caring for Roses in a Vase

1 Make sure your vase is clean. Before putting your roses up for display, clean your vase with soap and water. Using a nice, clean vase that’s been washed since its last use is incredibly important as dirty vases can harbor bacteria. The residue from previous flowers and their water can speed up your new flowers' deterioration process.

2 Fill your vase 1/2 to 3/4 full ahead of time to let the chlorine dissipate. If you’re really planning ahead, it’s a good idea to let tap water sit for 24 hours before using it in a vase. This lets some of the chlorine dissipate by the time you use it. In general, roses prefer less chlorinated water.
Alternatively, you can use clean, fresh rainwater or even bottled water to avoid chlorine entirely.

3 Add sugar to the water in your vase. There are many eccentric additives people believe help their roses last longer, but one of the simplest, most effective items to use is sugar. Just add 1 or 2 tablespoons of sugar to about a liter of water and be sure to follow all the steps below to preserve the life of cut roses.
Some people swear by a splash of lemonade or citrus soda (such as Sprite) in their vase water, while others put in vodka, vinegar, a crushed aspirin, copper pennies, or a tiny amount of bleach. You can try these methods, too, if you're intrigued.

4 Position your roses out of direct sunlight and heat. The cooler the room, the better your flowers will last, but be sure to keep it above freezing. Don't be tempted to put them on a windowsill so they can feed off the sunshine – the heat will have them withering in no time.
If the room your flowers is in runs particularly hot, have them nearer to where the air flows, such as next to an open window, near the door, or by an open air shaft.

5 Keep your flowers away from fruit. You should also keep your rose vase away from fruit to lengthen their life. Ripening fruit gives off gasses that will encourage your flowers to ripen - so put that fruit bowl somewhere else!
Unless, of course, you want your flowers to bloom more quickly. In which case, put your vase next to a bowl of apples, bananas, and oranges to quicken their maturation process.

6 Cut young flowers diagonally in the early morning before the day heats up. Preserving the life of cut roses starts when you cut them from the growing plant. Apart from cutting them in the morning, make sure you use a sharp knife to cut the stem and make your cut diagonally. Here's why:
Firstly, a clean cut helps the growing plant repair itself without infection setting into a raggedy wound.
Secondly, a clean slice on the cut flower will absorb better than a crushing cut from a blunt tool.
It’s better to make a diagonal (slanting) cut rather than a straight square one. This increases the area of cell tissue exposed to water so the stem can drink more.

7 Change the water in your vase every 1-3 days. It's important to change your roses' water regularly, ideally every 1-3 days, so they have a good supply on hand for feeding. This stops bacteria building up in the water and keeps it smelling fresh, too.
If you've tried any of the methods for keeping roses fresh (such as adding crushed aspirin to the water) remember to repeat this each time you change the water.

8 Each time you refill the water, snip up to an inch off the stems. This helps keep the cells that are in contact with the water fresh. Flowers will drink their water up over time, so keep it topped up as the water level drops.
If you can’t keep it topped up it’s fine to fill the vase up to about an inch from the top of the vase.

Caring for Roses in Your Garden

1 Give them plenty of well-draining, rich soil. Roses flower best if they have the right conditions. This includes a well-draining soil, a sunny spot, and good rich soil. Incorporate plenty of well-rotted manure into the soil, too. One bucketful per square meter is ideal.

It’s often a good idea to avoid planting roses where roses have been planted previously, as they can communicate diseases through the soil and growth can be slower to get going if one rose plant replaces another. If you cannot avoid re-using a rose bed, try to replace as much soil as possible to avoid cross-contamination.

2 Feed your rose plants using manure or specialized feed for a long flowering period. Roses are "hungry" plants that will need good nourishment. Ideally this should start at planting time when you fortify the soil with manure. Continue feeding the plant through the year as soon as the growing season starts in the late spring.
Your garden center should be able to provide an appropriate feed for rose plants. Check the instructions – most rose feeds will need to be applied twice or more during the flowering period.

3 Use mulch, too. You can help your rose plants retain water by mulching them – this will also keep weeds at bay. Mulching means applying a top layer of organic matter around the base of the rose. Manure works well as do grass clippings, bark or seaweed.
Remember to reapply mulch regularly. An annual application of mulch to about 2 inches in depth in the early winter is ideal.

4 Water rose plants regularly for lots of blooms. Roses like a lot of water. Remember containers dry out faster than beds, so roses planted in pots need more regular watering. Water the plant well and make sure it gets enough water after planting until it is well-established. This can take up to 2 years.

5 Cut off spent blooms to make roses flower again. Removing the faded flowers is one of the best ways to keep your rose flowering. This works because the rose plant isn’t investing its energy into producing rose hips and can instead make more blooms.
Wait until flowers are withered or dropping petals and use a clean blade or secateurs to snip the stem back to the first cluster of 5 leaves. It’s good practice to check your rose plant about twice a week during the flowering season to keep on top of the spent blooms.

6 Take care of your roses at the first sign of disease. If your rose plant suffers from pest or disease attack, it will invest energy into self-defense instead of producing more flowers. You can support your plant in its fight against pests and diseases by monitoring it for signs of either and using an appropriate treatment from the garden center.
Spray at the first sign of disease, remove aphids either by brushing the insects off or spraying with insecticide, and remove diseased foliage or any decaying stems where possible.
Common plant diseases include rust or black spot. You’ll see signs on the leaves if your plant is affected, so watch out for symptoms such as orange pustules on the underside of leaves, black spots, or yellow growth.

7 Prune your roses outside the flowering period. Maintain the health of your rose plant by pruning it outside the flowering period, such as the winter or early spring. This is especially important the first year after planting.
The best way to prune your rose bush depends on the variety of rose you have. Varieties such as a shrub or climbing rose benefit from different approaches to pruning, so get specific advice for your variety.
For any variety of rose plant you should always remove any dead or weak growth during pruning.


How to Propagate Lucky Bamboo

Lucky bamboo (botanical name "Dracaena sanderiana") is a small, shrubby plant that is sold extensively as a hardy houseplant. Despite its name, lucky bamboo is not related to bamboo and is not even native to Asia. Because of its development as a rainforest understory plant, it works well as a houseplant because it can tolerate moderate temperatures and very low light. The plant grows very quickly, and therefore it is useful to learn how to propagate lucky bamboo to produce new plants and avoid crowding the original plant.

1-Select a stalk for propagating. The stalk of the lucky bamboo plant is the thick, cylindrical base from which the smaller, leafy shoots grow. Select a stalk with at least 1 long, healthy shoot to take your cutting.

2-Trim the leaves from the shoot. Once you have selected a shoot to cut, remove all of the smaller leaves by plucking them off with your fingers. Leave only the few long, mature leaves at the top of the shoot. Removing the leaves keeps the plant's energy focused on growing new roots rather than supporting the leaves.

3-Cut the shoot off of the stalk. Use a very sharp knife or a pair of scissors to cut cleanly through the shoot about a half an inch (1 cm) away from where it meets the stalk. The cleaner and straighter the cut, the less likely it will be to succumb to a bacterial infection. It is a good idea to sanitize your blade in rubbing alcohol before making the cut.
If you want to save the stalk from which you took your cutting, you will need to cut it as well. Cut the stalk about a half an inch (1 cm) below the area where the cut shoot joined it. Garden shears will make cutting through big, woody stalks easier.
Once the stalk is cut, you need to seal the wound with wax to prevent bacterial infection. Melt some candle wax onto the wound until it is completely covered. When placed back in water or soil, the stalk will grow new shoots in a month or so.

4-Prepare a pot for rooting the new shoot. Lucky bamboo cuttings can be rooted in water or soil, but water works best for stimulating root growth. Prepare a small pot by filling it with purified water (bottled water works well). If you use tap water, it is best to let the water sit out exposed to the air for 24 hours before using it - this keeps the chlorine from damaging the plant.

5-Place the cutting into the pot. Place the freshly cut end of the shoot into the water, making sure it is submerged at least 1 inch (2.5 cm). Place the pot into a shady spot, as direct sunlight will harm the plant. In 1 or 2 months, the plant should have developed several roots from the cut end. The shoot will eventually grow new shoots and can be propagated again using the same method.


How to Handle and Apply Pesticides Safely

Pesticides are useful in the prevention of insect damage to crops, garden plants, and buildings, and keeping them out of our homes where they can spread disease and ruin food stored in pantries and bins. Safety is of utmost concern when using these toxic chemicals.

1-Read and follow all label instructions. Many pest control products have brochures or instruction pamphlets enclosed or attached to their container. Here are a few examples of the product instructions:
Mix 1 oz. of product per 1 gallon of water. This is a mix ratio. Using stronger concentrations does not make the product more effective, but can increase its toxicity.
Do not use in windy conditions. Windy conditions may cause the product to drift into unprotected areas, or into a waterway where contamination and unintentional aquatic life kill is possible.
Do not mix with other products. Mixing pesticides, or any chemical, may produce unexpected and dangerous results.

2-Read the warning label. The warning label contains specific information about the product. Some obvious information may include the following.
Its toxicity level.
"CAUTION" means that it is mildly toxic. Lethal dose is an ounce or more.
"WARNING" means that it is moderately toxic. Lethal dose is between a teaspoon and tablespoon,
"DANGER" means that it is highly toxic. Lethal dose is trace amounts.
Avoid fumes, use in well ventilated area. Liquid pesticides may produce poisonous fumes when the container is opened, or while the product is being mixed and applied.
Avoid contact with skin. Many chemical products may be absorbed through skin.
Avoid sparks or open flame. Pesticides are often suspensions in petroleum distillate solvents, which can be highly flammable.

3-Use only appropriate containers for measuring, mixing, and applying pesticides.
Never use food preparation utensils for this purpose. Even if you only intend to use a measuring cup for your pesticide, it could accidentally be picked up and taken into the kitchen later.
Mix your pesticide in the application equipment if possible, to avoid handling it during use. Commonly, compressed air or pump up garden sprayers are used for this purpose. In agriculture, tractor mounted, PTO driven equipment is used to apply pesticides on crops and farm land.

4-Mix only the amount of the product you intend to use. This can be accomplished by reading the information on the label under "application rate", generally in terms of gallons per acre, or 'gallons per 1000 square foot". Measure the area you intend to treat, and calculate the amount of material required to treat it. Storing left over mixed pesticides is generally not a good idea, but if you must, label the container according to contents and date mixed, and keep it tightly closed.

5-Wash all equipment after each use. Use copious amounts of water, and do not allow run off from washing to go into waterways. Keep the washing operation away from wells or other drinking water supplies.

6-Use appropriate safety equipment. This is usually listed on the warning and usage label for each specific product, and the following are some common items.
Safety glasses. These keep chemicals or dust from getting in the applicator's eyes.
Rubber gloves. Rubber, neoprene, or other chemical resistant gloves protect your hands from chemicals which may be absorbed through your skin.
Long sleeved shirts and long pants. Another barrier protection for your skin. When the application process is complete, remove clothing and rinse it thoroughly before laundering.
Rubber boots. Because leather or cloth boots can absorb and accumulate chemicals, it is often suggested that the person applying pesticides wear rubber boots.

7-Never smoke, drink, or eat while applying pesticides.

8-Keep people and animals out of areas treated with insecticides and other chemicals for the period recommended on the product label. If you are using a liquid spray, no one should reenter the area until the product is completely dry.

9-Be extremely careful applying pesticides in buildings or homes. Use only products specifically labelled for this purpose, and remove any loose items such as clothing, books, and toys prior to applying.

10-Do not use pesticides after any expiration dates on the package. Chemicals undergo changes over a period of time, and pesticides may become unstable, more toxic, or ineffective after the expiration date listed on the package.

11-Use pesticides only at the intervals recommended by the manufacturer. If insects return before the reapplication date, you will need to find a different control method. Most pesticides recommend treating (or retreating) a crop or area at specific intervals, often coinciding in the development rate of insects from egg or larval stage to adult. Overuse can create chemical resistance in the target insect and toxic levels of chemical buildup in the soil, plants, and environment the pesticide is used on.

12-Apply pesticides in the early morning or late evening to avoid excessive drift (wind is normally lower during these time periods), and to prevent exposing beneficial insects like bees and ladybugs to the effects of them.

13-Be aware that certain pesticides are systemically active, meaning the chemical is absorbed by the plant tissues and distributed throughout the plant. For use on edible crops, carefully follow the label instructions in regard to the period prior to harvest that pesticides may be applied, since simply washing the product will not remove the poison.

14-Alternate suitable pesticides to obtain the best results in pest control. This will ultimately give better control of insects and decrease the frequency of application.

15-Always look for the most environmentally sound, and least toxic pest control method. This contributes to safety by decreasing the use of poisons altogether. Planting certain flowers like marigolds, and herbs like garlic will naturally decrease the insect populations in your crop. Bacillus thuringiensis or "BT", is a bacterium compound which attacks certain insects when topically applied to plants, while being harmless to humans and animals.

Notes


  • When storing large quantities of pesticides, as in agricultural use, post signs so emergency personnel will be aware of them in the event of a fire or other disaster.
  • Use containers and measuring devices only for mixing and and using pesticides, and keep them stored with the pesticides they are used with.
  • Buy only the amount of pesticides you expect to use immediately or in one season, since many have expiration dates, and storing them, in general, can be dangerous.
  • Keep local emergency phone numbers and poison control center information nearby when using chemicals.
  • Keep lots of clean water available when handling these materials in the event of accidental contact. Washing material off your skin and out of your eyes is the first step if you are accidentally exposed to the pesticide.


How to Grow Grass from Seeds

Do you have a brand new lawn, or one riddled with bare patches of dirt? Growing grass in a yard provides ground cover and protects the soil from erosion, in addition to accenting your home with natural beauty. Learn how to pick out the right grass seed for your region, plant the seed correctly, and help it grow into a lush carpet of grass.

1-Research types of grass that grow well in your region. Most common grasses fall into one of two categories: cool season grasses and warm season grasses. It's important to find out which category grows best where you live to ensure you have a healthy lawn all year round.
Cool season grasses are planted in the summer or early fall, and they have a vigorous growing season in mid to late fall. These grasses tend to grow better in northern areas with cold winters and mild summers. Cool season grasses include the following:
Kentucky bluegrass, a fine, dark green grass that grows well in the shade.
Tall fescue, a low maintenance grass that is course in texture.
Perennial ryegrass, a medium-textured grass that grows well in full sun.
Warm season grasses are planted in the spring, and they grow lush and healthy in the summer. These grasses grow best in places with late, mild winters and hot summers. Warm season grasses include the following:
Bermuda grass, a fine grass that does better in full sun than shade.
Zoysia grass, a medium-textured grass that holds up better than most warm-season grasses during the winter.
St. Augustine grass, a course grass that won't survive during cold weather.

2-Decide what type of grass will grow best in your yard conditions. The conditions in your yard will affect the health of your grass as much as the climate in your region. Hundreds of seed varieties have been developed to grow in specific environments. Consider the following variables when choosing a type of grass:
Does your yard have good drainage, or is it prone to getting dried out? Certain seeds have been engineered to survive in waterlogged soil, and others are designed to be drought resistant.
Does your yard have a lot of shade, or does it get full sun? Choose a seed that seems to fit best with your yard conditions.
Are you planting grass for decorative purposes, or do you want to be able to walk outside in bare feet? Some grasses are beautiful but course to the touch, and others are soft and perfect for lounging outside.
How often do you want to mow your lawn? Some grasses grow quickly, and need attention every week or two, while others can be left alone longer.

3-Source your grass seed. You can buy grass seed at home and garden stores or online. Just make sure you buy from a reputable source. To the untrained eye, all grass seed looks alike, and you want to make sure you're getting what you paid for instead of a cheaper type of grass seed or even weed seed.
Calculate how much grass seed you need. Every type of seed provides a different amount of coverage, so after you calculate the square footage of the area where you're planting grass, talk to the salesperson at the home and garden or lawn care store to ask how much seed you'll need to buy.
Some seed sellers provide online grass seed calculators to help you calculate how much seed you need.

Preparing Your Soil for Planting

1-Till the top layer of soil. Breaking up the top layer will make it easier for the grass seed to take root. If you have a large area to cover, buy or rent a soil tiller that you can roll over the lawn to break up the soil. If you have a smaller area to cover, you can use a garden rake or hoe instead.
As you till, break up large clumps of dirt so that the soil is even and fairly fine.
Remove rocks, sticks, and other debris from the lawn.

If you're adding more seed to a lawn with bare patches, use a tiller or garden rake to break up the soil in the bare spots. Mow the rest of the lawn as short as you can.
2-Level the ground. If there are spots in your yard that pool with water when it rains, they need to be leveled out. Grass seed planted there won't survive if it's underwater for long periods of time. Level the ground by adding topsoil to the low places and indentations. Run the tiller over the area to even it out around the edges and blend it with the surrounding soil.
3-Fertilize the soil. Grass grows much better in fertilized soil, especially if you're working with a yard that has been planted with grass many times over the years. Buy a fertilizer specially made to help grass grow.

Planting the Seed

1-Scatter the seed. If you have a large area to cover, rent or buy a lawn spreader or mechanical seeder, which will shoot grass seed evenly across your lawn. If you have a smaller area to cover, spread it over your lawn by hand.
Use the amount of seed the lawn care expert at your home and garden store, or the seed calculator you used online, told you to use. It's important to use the correct amount of grass to ensure your lawn grows evenly.

Don't overseed the lawn. Resist the temptation to use up extra seed by spreading it over the lawn. Overseeded areas will have thinner grass, since seedlings there will have to fight for limited nutrients.
2-Protect the seeds with topsoil. Spread a thin layer of topsoil over the entire seeded area, either by hand or using a cage roller. Newly planted seeds need to be protected from the elements until they take root.
3-Water the soil. Put your garden hose head on the "mist" setting and lightly water the soil. Make sure it gets thoroughly damp.
Don't use a strong stream of water, or you might wash the grass seed away.
Newly planted seeds should be watered every day until the grass has sprouted and grown a few inches.
4-Keep people and pets off the lawn. The seeds should be protected from trampling for the first few weeks after they are planted. Consider putting up a sign or using string or flags to rope off the area. If pets and other animals run loose in your area, you could put up a temporary fence to protect your yard from harm.

Taking Care of the Grass

1-Keep it watered. After the grass has grown a few inches high, it doesn't need to be watered daily. Water it deeply a few times a week, making sure the soil gets thoroughly soaked.
If the grass starts turning brown or looking dry, water it right away to bring it back to life.

When possible, let nature take care of the grass. Don't water it after a heavy rain, or it could get waterlogged.

2-Mow the grass. Mowing grass actually helps it grow thick and healthy. If it grows too tall, it will get reedy and tough. Mow for the first time when the grass is 4 inches tall. Continue mowing when the grass reaches this height.
If you leave the grass clippings on the yard after mowing, they act as a natural mulch and help the grass grow stronger.
Consider using a push reel mower, rather than a power mower. Push reel mowers are better for the health of your grass, since they snip it neatly rather than tearing and shredding it, which leaves it more susceptible to disease. Plus, push reel mowers leave lawns looking professionally manicured, and they don't emit pollution.

3-Fertilize the lawn. After about six weeks, when the grass is healthy and tall, give it another application of fertilizer specifically made to grow grass. This will ensure it continues to grow well for the rest of the season. Plan to fertilize it at the beginning of its growing season every year.

Notes


  •  If you're reseeding a patchy lawn, try to determine why grass isn't there in the first place. Is there a problem with soil Erosion? Poor soil? Drought? Flood? The answer to that question could make a huge difference in how you approach the grass seeding process. A locally-based lawn specialist can give you great information on this subject.
  • Birds love to see people out spreading grass seeds. It essentially means that every break you take while seeding is an opportunity for a feast for free. The sooner you get the seed down and under a layer of soil, the better chance you have of keeping seed in the designated area.


How to Grow Bird of Paradise

The Bird of Paradise ( Strelitzia reginae) is an exotic plant that is native to South Africa. Its name comes from its flowers that resemble a flying bird. The plant is a popular ornamental piece due to its attractiveness. However, certain conditions must be met in order for the plant to reach its maximum flowering capability. Learning how to grow Bird of Paradise properly will increase the beauty and health of your plants.
1-Find an ideal area to plant your Bird of Paradise plant that promotes growth.
You will want to grow your Bird of Paradise in a pot if you live in a climate that has temperatures below 50 degrees Fahrenheit (10 degrees C). The plant can stay outside during warmer temperatures and be brought indoors when it is cooler.
A Bird of Paradise plant can withstand a salty breeze and is suitable for locations near the ocean.
Bird of Paradise plants do best in spots that receive full sun.
They prefer loamy soil that is rich and well-drained.

Test the soil and strive to maintain a pH of about 7.5.
2-Dig a hole with a shovel that is twice the diameter and as tall as the root ball on the Bird of Paradise plant.

Allow at least 6 feet (1.8 m) between each plant if you are planting multiple Birds of Paradise. Each plant will need adequate room to flower.
3-Saturate the plant with water before placing it into the hole or transplanting it into a pot.
4-Keep the soil moist during the initial stage before it becomes established.
Placing mulch around the base, but not around the stem, of the plant will help it retain moisture.
Watering the plant can be reduced once it is established--after about 6 months.

Allow the plant to dry out a little more during the fall and winter months and spray mist on its leaves.
5-Fertilize the plant with a 3:1:5 fertilizer or compost during the spring before it begins new growth.

Continue to fertilize the plant once per month during the summer.
6-Remove dead leaves and diminishing flowers from the plant to help reduce the chance of fungus.
Note
  • A Bird of Paradise plant can be started from seeds. However, it can take up to 5 years before you will see flowering on your plant.
Warnings
  • The seeds of the Bird of Paradise are toxic. They can cause abdominal pain and vomiting in children and dogs.
  • Mulch against the stem of the plant will increase the chance of the Bird of Paradise getting stem rot. Stop the mulch 2 to 3 inches (5.1 to 7.6 cm) from the stem.


How to Grow Rosemary

Fragrant, delicious rosemary is a wonderful herb to grow on your own, either indoors in a pot or outside in your garden. Rosemary is generally not hard to grow, and once it taken root, this perennial, woody shrub will thrive for years. Read on to learn how to plant, care for, and harvest rosemary.

1-Get a rosemary cutting. Rosemary is easiest to grow from a cutting, rather than planting seeds. Go to your local nursery and get a cutting, or better yet, find a rosemary plant you admire and clip off a few 4 inch pieces to propagate. The best time to do this is in the late spring, but if you live in a warmer climate, this can be done during early autumn as well. The plants you'll be able to grow from the cuttings will have the same qualities as the original bush.
If you'd prefer to grow a variety you haven't seen in your area, you can order a cutting online or ask your nursery to get one for you. There are many varieties of rosemary, each with slightly different properties. Some grow very bushy and tall, while others tend to trail; some have purple or blue flowers, some white.

You can also buy a seedling if you don't want to propagate a cutting.

2-Propagate the rosemary. Put each cutting into a small pot of soil filled with two-thirds coarse sand and one-third peat moss. Set the pot in a sunny place, but not in direct sunlight. Water the cuttings regularly and keep in a warm spot until the roots form, which should take about three weeks.
To help the cuttings grow, you can place the entire pot inside a plastic bag with a few holes punctured in the top. This will help regulate the temperature and keep things warm and moist.

You may also dip the tips of the rosemary cuttings in rooting powder to give them a head start.

3-Plant the seedlings. Once roots have formed, you can plant the rosemary either in pots or outdoors in your garden. Rosemary will adapt to most growing conditions and is quite hardy. It's happy with snow, limestone, high temperatures, by the seaside, and all sorts of soils. It will grow its best however, in a warm to hot, fairly dry climate. Choose a full sun aspect that is fairly dry.
Decide whether you want to keep growing it in pots or as a shrub in the garden. It can also be trained as a delightfully scented hedge. For cooler climates, containers may be best so that you can move them if needed.

If planting in the garden, choose soil that drains well. Rosemary can suffer from root rot in waterlogged soil. The more alkaline the soil, the more fragrant the rosemary will be. Dig in some lime if the soil is too acid.

Caring for Rosemary

1-Water rosemary infrequently. Rosemary prefers a drier soil, so don't overdo the watering. It will be happy with the average garden watering. It likes to source most of its water from rain.
2-Don't worry about fertilizing. This is not a herb that needs it. However, make sure that there is some lime in the soil.
3-Bring the pots indoors in winter if you live in a cold place. Though rosemary is hardy, it can suffer in very cold weather and its branches can get damaged when laden with heavy snow. To ensure the plant survives the winter, it's best to bring it indoors.
4-Prune rosemary as needed. Pruning isn't necessary for the health of the plant, but rosemary bushes tend to grow quite large and take up a lot of garden space. Cut the branches back by a few inches each spring to help them retain their shape.

Harvesting and Using Rosemary

1-Harvest rosemary. Pick sprigs of rosemary leaves as needed. The bush will just keep on happily growing. Since rosemary is evergreen, you can harvest it all year round.
2-Store the sprigs in a cool, dry place. You can also freeze rosemary by placing it in food storage bags and storing in the freezer. Alternatively, strip the leaves from the stems and store in airtight jars. Stored this way, rosemary will slowly dry and will keep for several months.
3-Eat rosemary. Rosemary is a wonderful compliment to both sweet and savory dishes. Use it to add depth to meat and chicken, bread, butter, and even ice cream. These delicious recipes make use of rosemary:
Herb bread.
Marinated pork.
Rosemary syrup.

Lemon sorbet with rosemary.
4-Use rosemary around the house. Rosemary can be dried and made into scented drawer sachets, used as in ingredient in homemade soap, turned into a fragranced water that makes your hair shiny and soft, and more. You can also simply brush against your rosemary plant to experience a fresh burst of its uplifting scent.
Notes 
  • Rosemary has different forms, including different colours, leaf shapes and sizes. Flower colours also vary, usually from pale blue to white.
  • Rosemary can be frozen for up to six months. Simply place the sprigs into freezer bags and freeze. However, if you have your own bush, it's probably easiest to just pick as needed rather than take up extra freezer space.
  • Rosemary can tolerate salt and wind, making it an ideal seaside garden plant. However, it does grow best in a sheltered position, such as up against a wall, so try to provide this if possible.
  • This evergreen shrub grows to about 2 metres (6 feet) in height. However, it is very slow to reach this height. The dwarf variety will reach about 45cm (18") and is suitable for container growing.
  • If planting in a container, be reassured that rosemary makes a great pot plant. This is an ideal solution for very cold climates, as you can bring it indoors during the winter. While rosemary can tolerate minor amounts of snow, it cannot tolerate a lot, or very cold temperatures. In a container, keep it clipped to maintain a suitable shape.
  • Rosemary is for "remembrance".
  • Plant a rosemary bush near the clothesline. Clothes that brush against it will smell gorgeous. It's also a nice herb to brush against on a raised walkway.


Creative Woodland Gardens ideas